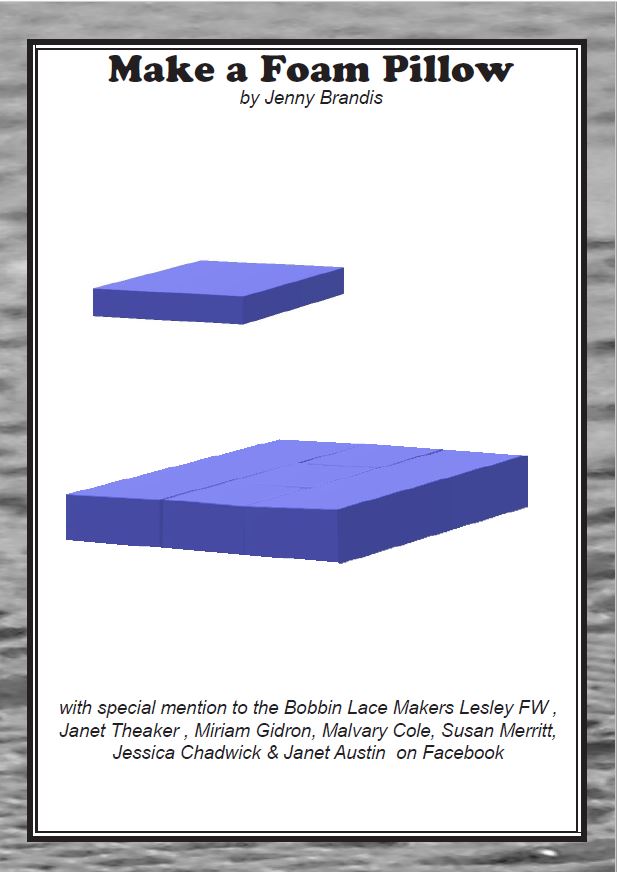
The making of a Block Pillow
I began researching bobbin lace making in February 2005 by using a search engine and the Internet. The first thing I realised is that there are a lot more people out there doing lace making that I had thought. The second thing I found out was that most suppliers are a long way from where I am - and I wanted the learn NOW.
Being a bush raised kid I decided to improvise until my 'official' gear arrived - and this is the story of the birth of the 9 block pillow - Kununurra style.
I have now in 2018 written a quick tutorial on this subject. It can be downloaded for free here. Now continue reading about the journey ....
I began by considering the recommendations of the Gumlace group of Australian Lace Makers. Wow, what a group to find my first day of surfing!!
The material of the pillow should be densely packed, covered in finely woven, dark covered fabric. Do not use polystyrene.
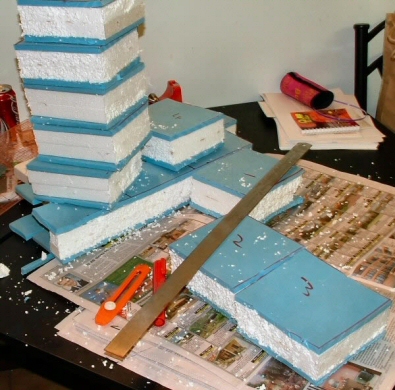
Typical of me, I used what was to hand, so the 'mans land' (husbands shed) was raided for a sheet of polystyrene foam - 17 x 40 x 1 inches. Next I looked around for the old high impact foam he uses in his swag (he wont miss it for a while)
I then used the trusty cutter to cut the polystyrene in half and cut two x 20 inch lengths off the blue high impact foam
Now that I have the basics - I get out the tube of liquid nails and glue the two pieces of polystyrene together, and sandwich that between the two sheets of high impact foam, stack some heavy books on it and leave for 24 hours to bond
Why did I choose these particular ingredients - well, besides them being to hand, the polystyrene was to hand. Although I realise that if I was pinning directly into it, the foam would quickly break up as it is not 'self healing' I have used the high impact foam because it is self healing (the pin holes closer over once the pin is removed) The blue high impact foam is just under a half inch thick so the pins will not penetrate to the polystyrene.

Twentyfour hours is too long for me - 18 hours later I get out the metal ruler and permanent marker to mark out my nine blocks. A quick measure shows that the individual blocks are going to have to be 6 x 5.5 inches each. Mark it out and again with the trusty cutter at fully extended blade, I cut out the 9 blocks.
A quick trip to the craft shop nets me with some felt yardage (blue) and 3 mts of grey, non stretch polycotton. Then comes the boring bit - hand sewing the blocks inside the felt, and again inside the grey. Took me the better part of Labour Day to do the cutting and sewing but I have encased the blocks completely with both layers.
Laid the lot out on the table and realised that the blocks would not stay together too good, so again into the sewing box for some wide elastic, two safety pins and ..... the final product. I will use the tray to the left of the photo below to cart it about to meetings, but otherwise it is on the work table until further notice.

So, the next step is waiting until Thursday night when I take my pillow to Alice for her considered opinion. And what do you think? Will it work?
Alice was ok with it but the tray/board is a problem as it has a lip around it and the pillows do not sit flat. Answer - a piece of marine ply wood with angle aluminum edging to hold the pillows on/together.
On to making a paper bobbin
I have revisited this idea and the following are what I consider to be improvements.
- Cut the felt to only cover the top and bottom of each segment - the sides don't have a need for them as you will not be pinning lace to them
- Toss out the handsewing! PIN the felt to the pillow (1 pin in each corner)
- PIN the outer fabric - faster, easier and you can now remove the fabric for a quick wash/replace if it gets soiled
- Toss out the heavy wooden baseboard
- Find a picture framer and purchase some of their foam/card backing - much lighter to carry
- secure the pillow to the new foam card backing by wrapping 1 inch wide elastic around base and pillows. - this giving fast access to repositioning the indivual blocks
- Last but not least - make a rectangle bag to carry the lot in.
This pillow has been retired from use - the only reason being that my cutting of the blocks was a bit wonky and that meant that the gap between the blocks were a bit too wide for my comfort. But I will remember this pillow with very fond memories as it was my FIRST.
|